Jenkins2をコード化しよう - その4:Swarm PluginでJenkins Slaveを登録する
前回の記事 Jenkins2をコード化しよう - その3:Jenkins Job DSLプラグインでジョブをコード化する ではJenkinsのジョブをGroovy DSLで記述する方法と、利用例を紹介しました。
今回はJenkins Slave登録の方法を少し工夫してみましょう。
Swarm PluginでSlaveからMasterへノード登録する
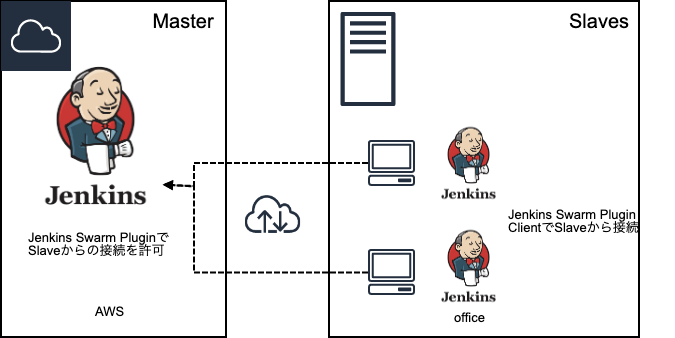
JenkinsをMaster-Slaveの冗長構成で組む場合に、従来であればMaster側の管理画面にある [ノードの管理] からビルドSlaveにあたる別のJenkinsを登録します。
しかし、稀にネットワーク的な理由でMasterからSlaveに接続できない場合もあります。 例えば、Jenkins Masterはクラウド上にあるのに、SlaveはiOSアプリをビルドするためにオンプレのMacで構築する(ファイアウォールに穴あけしたくない)必要がある場合などがそれに当たります。
そこで今回紹介する Swarm Plugin を使うことで、 ビルドSlave側からJenkins Masterに対してノード登録ができる のです。とても便利です。
イメージは以下の通りです。Jenkins Masterには Swarm Plugin をインストールし、 Jenkins SlaveのマシンにはMasterにインストールされた Swarm Plugin と同じバージョンの Swarm Plugin Client をダウンロードしておきます。
Swarm Plugin の使い方
Masterの設定
Swarm Plugin をインストールするだけ
Swarm Plugin をインストールすれば、Master側ではプラグインの追加設定はありません。 ただし、Slaveからネットワーク的に接続可能な状態にしておく必要はあります。例えば、Swarm Plugin Client が使うJNLP接続のポート番号を解放しておくなどです。
Slaveの設定
Swarm Plugin Clientを配置する
Swarm Plugin Client でダウンロードするクライアントは jar ファイルです。スタンドアロンで動作するため、 java -jar コマンドで起動できるようにJavaをインストールしておく必要があります。
java -jar コマンドで起動する
次に、Swarm Plugin Client を起動します。以降では Swarm Plugin Client 3.15 を使っています。
まずは --help で指定可能オプションを確認しましょう。
java -jar swarm-client-3.15.jar --help
こんな感じですね。
 -autoDiscoveryAddress VAL              : Use this address for udp-based
                                          auto-discovery (default
                                          255.255.255.255)
 -candidateTag VAL                      : Show swarm candidate with tag only
 -deleteExistingClients                 : Deletes any existing slave with the
                                          same name.
 -description VAL                       : Description to be put on the slave
 -disableClientsUniqueId                : Disables Clients unique ID.
 -disableSslVerification                : Disables SSL verification in the
                                          HttpClient.
 -executors N                           : Number of executors
 -fsroot FILE                           : Directory where Jenkins places files
 -help (--help)                         : Show the help screen
 -labels VAL                            : Whitespace-separated list of labels
                                          to be assigned for this slave.
                                          Multiple options are allowed.
 -labelsFile VAL                        : File location with space delimited
                                          list of labels.  If the file changes,
                                          restarts this client.
 -logFile VAL                           : File to write STDOUT and STDERR to.
                                          (Deprecated, use -Djava.util.logging.c
                                          onfig.file={path}logging.properties
                                          instead)
 -master VAL                            : The complete target Jenkins URL like
                                          'http://server:8080/jenkins/'. If
                                          this option is specified,
                                          auto-discovery will be skipped
 -maxRetryInterval N                    : Max time to wait before retry in
                                          seconds. Default is 60 seconds.
 -mode MODE                             : The mode controlling how Jenkins
                                          allocates jobs to slaves. Can be
                                          either 'normal' (utilize this slave
                                          as much as possible) or 'exclusive'
                                          (leave this machine for tied jobs
                                          only). Default is normal.
 -name VAL                              : Name of the slave
 -noRetryAfterConnected                 : Do not retry if a successful
                                          connection gets closed.
 -password VAL                          : The Jenkins user password
 -passwordEnvVariable VAL               : Environment variable that the
                                          password is stored in
 -passwordFile VAL                      : File containing the Jenkins user
                                          password
 -pidFile VAL                           : File to write PID to
 -retry N                               : Number of retries before giving up.
                                          Unlimited if not specified.
 -retryBackOffStrategy RETRY_BACK_OFF_S : The mode controlling retry wait time.
 TRATEGY                                  Can be either none (use same interval
                                          between retires)or 'linear' (increase
                                          wait time before each retry up to
                                          maxRetryInterval) or 'exponential'
                                          (double wait interval on each retry
                                          up to maxRetryInterval). Default is
                                          none.
 -retryInterval N                       : Time to wait before retry in seconds.
                                          Default is 10 seconds.
 -showHostName (--showHostName)         : Show hostnames instead of IP address
 -sslFingerprints VAL                   : Whitespace-separated list of accepted
                                          certificate fingerprints
                                          (SHA-256/Hex), otherwise system
                                          truststore will be used. No
                                          revocation, expiration or not yet
                                          valid check will be performed for
                                          custom fingerprints! Multiple options
                                          are allowed.
 -t (--toolLocation)                    : A tool location to be defined on this
                                          slave. It is specified as
                                          'toolName=location'
 -tunnel VAL                            : Connect to the specified host and
                                          port, instead of connecting directly
                                          to Jenkins. Useful when connection to
                                          Hudson needs to be tunneled. Can be
                                          also HOST: or :PORT, in which case
                                          the missing portion will be
                                          auto-configured like the default
                                          behavior
 -username VAL                          : The Jenkins username for
                                          authentication
必要そうなものを掻い摘んで設定しましょう。
java -jar swarm-client-3.15.jar \
  -master https://your-host.net \
  -name your-mac-name \
  -deleteExistingClients \
  -showHostName \
  -disableClientsUniqueId \
  -labels 'mac' \
  -description 'Slave for iOS build' \
  -username=username \
  -password=password &
私が設定しているオプションは以下です。
-master:Master Node のURL。これを使ってSlaveから接続に行きます。-name:Master Nodeに認識させるSlaveの名前-deleteExistingClients:同名のSlaveが既に存在していたときに削除してから登録させる-showHostName:IPアドレスではなく、ホスト名を表示する-disableClientsUniqueId:Master Nodeにユニークに認識させるための、自動で振られるUniqueIDを付与しない。Jenkinsfile上でノード名指定でジョブを実行させたい場合には指定した方が良いです 。-labels:Slaveに付与するラベル。ラベルを複数指定することも可能。複数のSlaveにビルドを振りたい場合に使う。-description:マシンの説明-username:認証時のユーザ名-password:認証時のパスワード
Masterのビルドキューの下にSlaveが登録されていればOKです。
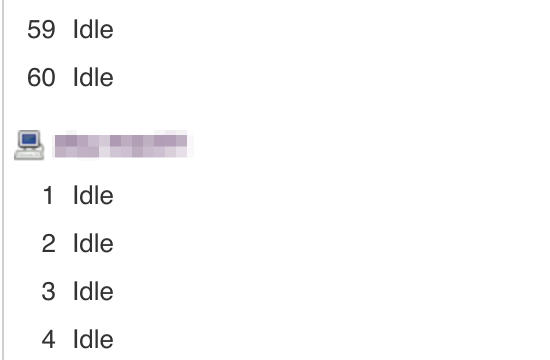
余談ですが、デフォルトでビルドキューは4みたいですね。
まとめ
今回は Swarm Plugin を使って、SlaveからMasterへのノード登録ができるようになりました。 ネットワーク的な制約等でMaster側から接続できない場合や、Slaveが動的に増減する場合に重宝するでしょう。 対になるClient JarをSlave側で起動するひと手間はありますが、常時起動するような場合にはさほど気になるコストではないと思います。