Google Cloud SDKをセットアップする
普段はもっぱらAWSなのですが、GCP特有のサービス(機械学習や自然言語、BigQueryなど)を使う機会に恵まれたため、まずその調査から始めたいと思います。
まずはCLIでしょ
仕事でGCPのサービスの利用を検討することになり、まずはセットアップができないと話にならないので今回はその手順をまとめました。
APIとして提供されている機能もあるのでCLIから実行できた方が嬉しいだろう、という考えもあり、まずはCLIで gcloud コマンドが使えるようにまでしたいと思います。
Google Cloud SDK をインストールする
まずは Google Cloud SDK をインストールしましょう。私は普段遣いのPCがMacOSですので、MacOS向けのバイナリでのセットアップを行います。
手順は Quickstart for macOS に記載されているので、 そちらを参考にいただければ問題なくインストールでいきます。
ただ、リンク先ではtarballを解凍する手段になるので、 今回は Homebrew を使っています。
1brew tap caskroom/cask
2brew cask install google-cloud-sdk
gcloud init で gcloud の設定を初期化します。ここからは対話形式で設定が続きます。
ログイン済みのGoogleアカウントがデフォルト設定の選択肢として提案されます。
今回は新規で作成するので 2 を選択します。
 1gcloud init
 2
 3> Welcome! This command will take you through the configuration of gcloud.
 4>
 5> Settings from your current configuration [default] are:
 6> core:
 7>   account: [email protected]
 8>   disable_usage_reporting: 'True'
 9>
10> Pick configuration to use:
11>  [1] Re-initialize this configuration [default] with new settings
12>  [2] Create a new configuration
13> Please enter your numeric choice:
設定名称を要求されるので、入力します。
1> Enter configuration name. Names start with a lower case letter and
2> contain only lower case letters a-z, digits 0-9, and hyphens '-':
3設定名称を入力する
設定が進むと、紐付けるGoogleアカウントを指定します。
今回は新規で紐付けるので 2 にします。
1> Your current configuration has been set to: [(設定名称)]
2>
3> You can skip diagnostics next time by using the following flag:
4> gcloud init --skip-diagnostics
5>
6> Network diagnostic detects and fixes local network connection issues.
7> Checking network connection...done.
8> Reachability Check passed.
9> Network diagnostic (1/1 checks) passed.
10>
11> Choose the account you would like to use to perform operations for
12> this configuration:
13> [1] [email protected]
14> [2] Log in with a new account
15> Please enter your numeric choice:
16
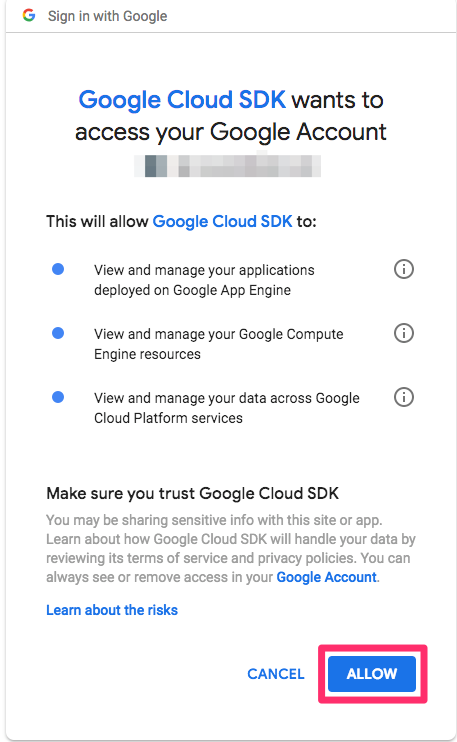
172ブラウザが起動し、Googleアカウントの認証が要求されます。
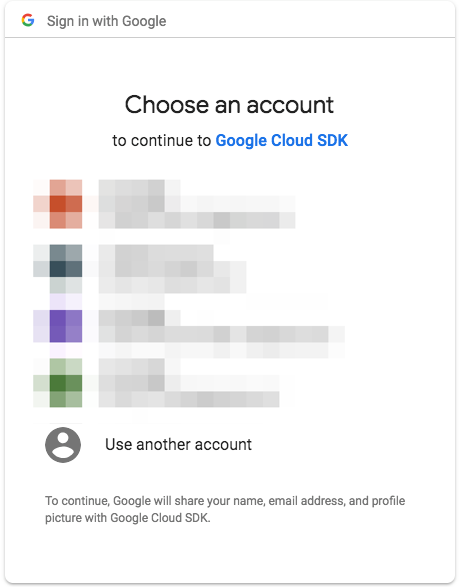
利用規約を確認し許可します。
認証が終了した後、ターミナルに戻って、GCP上のプロジェクトを選択します。 既にGCP上でプロジェクトを作成してしまっていたので 1 を選択します。
1> You are logged in as: [[email protected]].
2>
3> Pick cloud project to use:
4> [1] xxxxxxxxxx
5> [2] Create a new project
6>Please enter numeric choice or text value (must exactly match list
7> item):
8>
91
Compute Engineのデフォルトのリージョンの設定有無が聞かれます。とりあえず Y にします。
1> Your current project has been set to: [xxxxxxxx].
2>
3> Do you want to configure a default Compute Region and Zone? (Y/n)?
4Y
リージョン番号のリストの入力を求められるので、日本のある 32, 33, 34 のいずれかで選択しておきます。
 1> Which Google Compute Engine zone would you like to use as project
 2> default?
 3> If you do not specify a zone via a command line flag while working
 4> with Compute Engine resources, the default is assumed.
 5> [1] us-east1-b
 6> [2] us-east1-c
 7> [3] us-east1-d
 8> (中略)
 9> [32] asia-northeast1-b
10> [33] asia-northeast1-c
11> [34] asia-northeast1-a
12> (中略)
13> Did not print [3] options.
14> Too many options [53]. Enter "list" at prompt to print choices fully.
15> Please enter numeric choice or text value (must exactly match list
1632
これで一通り設定が完了しました。
動作確認:自然言語APIを試してみる
セットアップはできたので、CLIで自然言語APIを試してみます。
1gcloud ml language analyze-syntax --language=ja-JP \
2  --content='子供が嫌いな野菜とか3種類くらい取皿に乗せて、1個だけ残す代わりに残りは全部キレイに食べるルールにしてる。'
権限がないと言われるので、CLI経由でAPIを使う権限を設定します。
1> API [language.googleapis.com] not enabled on project [(プロジェクト番号)].
2> Would you like to enable and retry (this will take a few minutes)?
3> (y/N)?
4y
レスポンスが返ってきました。分かってはいましたが analyze-syntax の自然言語APIは可視化してあげないとつらいですね笑。
 1{
 2  "language": "ja-JP",
 3  "sentences": [
 4    {
 5      "text": {
 6        "beginOffset": 0,
 7        "content": "\u5b50\u4f9b\u304c\u5acc\u3044\u306a\u91ce\u83dc\u3068
 8        \u304b3\u7a2e\u985e\u304f\u3089\u3044\u53d6\u76bf\u306b\u4e57\u305b
 9        \u3066\u30011\u500b\u3060\u3051\u6b8b\u3059\u4ee3\u308f\u308a\u306b
10        \u6b8b\u308a\u306f\u5168\u90e8\u30ad\u30ec\u30a4\u306b\u98df\u3079
11        \u308b\u30eb\u30fc\u30eb\u306b\u3057\u3066\u308b\u3002"
12      }
13    }
14  ],
15  "tokens": [
16    {
17      "dependencyEdge": {
18        "headTokenIndex": 11,
19        "label": "NSUBJ"
20      },
21      "lemma": "\u5b50\u4f9b",
22      "partOfSpeech": {
23        "aspect": "ASPECT_UNKNOWN",
24        "case": "CASE_UNKNOWN",
25        "form": "FORM_UNKNOWN",
26        "gender": "GENDER_UNKNOWN",
27        "mood": "MOOD_UNKNOWN",
28        "number": "NUMBER_UNKNOWN",
29        "person": "PERSON_UNKNOWN",
30        "proper": "NOT_PROPER",
31        "reciprocity": "RECIPROCITY_UNKNOWN",
32        "tag": "NOUN",
33        "tense": "TENSE_UNKNOWN",
34        "voice": "VOICE_UNKNOWN"
35      },
36      "text": {
37        "beginOffset": 0,
38        "content": "\u5b50\u4f9b"
39      }
40    },
41    (中略)
42  ]
43}
まとめ
今回はGoogle Cloud SDKが実行可能になるまでのセットアップ手順を書きました。 これからGCPもいろいろ触ってみたいと思います!